Starting a home décor project without a clear plan is one of the most expensive mistakes you can make. You buy a throw cushion, fall in love with a lamp, pick up a rug on sale, and six months later you have a room full of things that don't quite belong together. A solid DIY home décor workflow fixes that. It turns scattered enthusiasm into a sequence that actually delivers the room you pictured. This guide walks you through every stage, from gathering inspiration and setting a budget to executing projects confidently and checking your results, so your creativity goes further and your money goes where it counts.
Table of Contents
- Key takeaways
- The DIY home décor workflow: tools and materials you need first
- Planning your project: from inspiration to schedule
- Executing your projects: practical techniques that work
- Verifying results and troubleshooting
- My honest take on making this workflow stick
- Ready to start your next project?
- FAQ
Key takeaways
| Point | Details |
|---|---|
| Sequence before you shop | 70% of redesign regrets come from buying accent décor before finalising your furniture layout. |
| Painting delivers the best return | Interior painting costs £40 to £60 in supplies versus hundreds for professional labour. |
| Upholstery fabric choice matters | Use boucle, velvet, or linen weave for padded projects; stretch fabrics expose foam edges. |
| Anchor the room first | Place your largest furniture pieces before selecting anything decorative, following the 70/30 rule. |
| Verify spatial flow after setup | Assess lighting, rug sizing, and furniture placement once everything is in position before declaring the project done. |
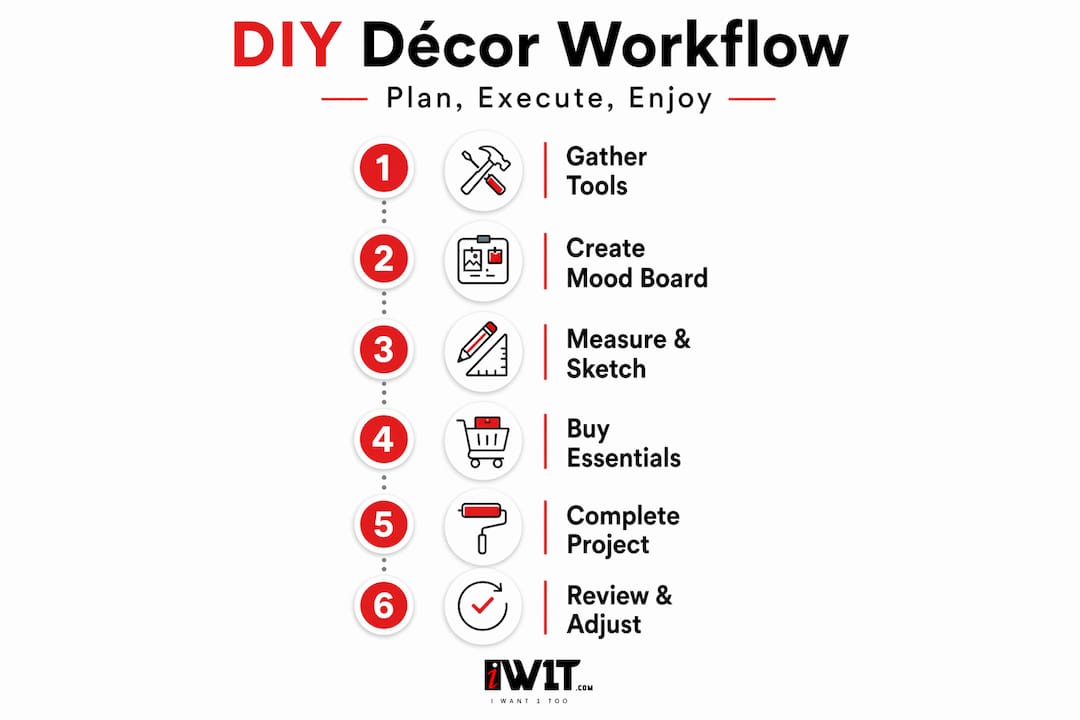
The DIY home décor workflow: tools and materials you need first
Before you touch a wall or order a single item online, take stock of what you already own and what gaps you need to fill. A well-prepared workspace and a clear kit make every subsequent step faster and less stressful.
Your core tool kit
These are the tools that appear in almost every home décor project, regardless of scale:
- Measuring tape (at least 5 metres): non-negotiable for furniture planning and wall art placement
- Spirit level: hanging anything straight without one is a gamble
- Drill and drill bits: for picture hooks, shelving brackets, and curtain rails
- Paintbrushes and rollers: a 9-inch roller with a 12mm nap sleeve covers most wall textures well
- Craft knife and cutting mat: for wallpaper trimming and upholstery work
- Staple gun: the single most useful tool for DIY upholstery projects
Materials and workspace
Set up a dedicated workspace before your first project begins, even if it's just a cleared kitchen table with a drop cloth underneath. For painting, pick up painter's tape, sandpaper in 120 and 220 grit, a good-quality primer, and your chosen topcoat. For upholstery work, you'll need high-density foam, upholstery-weight fabric, and a plywood or MDF base.
Pro Tip: Gather all your materials before you start any phase of a project. Stopping midway to source a missing item breaks your rhythm and often leads to poor substitutions.
Setting a realistic budget before purchasing anything is equally critical. A full bedroom transformation including board-and-batten walls, new furniture, and accessories typically takes around eight weeks and can cost approximately £1,200 to £1,500 depending on sourcing decisions. Knowing this upfront prevents the budget creep that derails so many creative home projects.
| Tool or material | Typical use | Approx. cost |
|---|---|---|
| Drill and bits | Shelving, curtain rails, hooks | £30 to £70 |
| Staple gun | Upholstery, fabric panels | £15 to £35 |
| 9-inch paint roller kit | Feature walls, full room painting | £10 to £20 |
| High-density foam (per sheet) | Headboards, bench cushions | £20 to £40 |
| Upholstery-weight fabric (per metre) | Headboards, cushion covers | £12 to £30 |
Planning your project: from inspiration to schedule
This is where most DIY interior design efforts go wrong. People skip the planning phase because it feels less satisfying than actually making something. But the planning phase is what separates a room that looks pulled-together from one that looks busy and unresolved.
Build your mood board first
Start by collecting images. Pinterest is genuinely useful here, not for copying a look wholesale, but for identifying which elements keep appearing in the images you save. If you keep gravitating towards warm neutrals, natural textures, and brass accents, that's your direction. Choose one object in your room as your "springboard," something you already own and love, perhaps a rug, an artwork, or a piece of furniture, and build your colour palette and material choices outward from it.
Pro Tip: Limit your mood board to 12 to 15 images maximum. More than that and you lose coherence. The best interior designers work with tight briefs, not open-ended inspiration dumps.
Measure and sketch your layout
Room layout planning should reflect actual traffic flow and focal points, not just what looks symmetrical on paper. Walk the room at different times of day. Notice where people naturally stand, where light falls, and what your eye goes to first when you enter. Then sketch a scaled floor plan on graph paper, with each square representing 30cm. This doesn't need to be architectural. It just needs to be accurate enough to test furniture arrangements before you lift anything heavy.
Sequence your purchases correctly
This step is the one most costly DIY mistakes trace back to. Follow this order:
- Finalise your floor plan and furniture layout on paper
- Source and place your largest anchor pieces (sofa, bed, dining table)
- Select flooring and window treatments once the furniture is confirmed
- Choose lighting based on where your furniture sits
- Add rugs to define zones after furniture placement is locked in
- Select accessories, cushions, artwork, and plants last
The 70/30 rule applies here: spend 70% of your budget on the anchoring elements and 30% on decorative items. Reversing that ratio is the most common cause of rooms that feel unfinished despite a lot of spending. For step-by-step décor sequencing specific to UK homes, the DIY home décor guide from Iw1t breaks this down further.
Executing your projects: practical techniques that work
With your plan set and your materials ready, execution becomes much more straightforward. Here are the projects that deliver the highest return for the time you invest.
Painting interiors
Painting is the single highest-return task in any DIY home décor workflow. The cost difference is stark: supplies run £40 to £60 per room, compared to £300 or more for professional labour. The technique matters more than the paint brand. Follow this sequence:
- Clean walls with sugar soap and allow to dry fully
- Fill any holes or cracks with filler, sand smooth, and prime the filled areas
- Apply a full coat of primer to new plaster or bare wood
- Cut in around edges and corners with a brush before rolling large surfaces
- Apply two thin coats of topcoat rather than one thick coat, allowing full drying time between each
Building a DIY upholstered headboard
This project looks far more complex than it is. A high-quality boucle channel headboard can be built for under £55 with no sewing and no sawing required, compared to £400 to £800 for retail versions. Cut your MDF or plywood base to size at a timber merchant (most will do this for a small fee). Attach high-density foam with spray adhesive, then pull your fabric taut and staple it to the back of the board.
When choosing fabric, upholstery-weight materials like boucle, velvet, and linen weave hold their shape far better than stretch fabrics, which pull unevenly and show foam edges through the surface. Pick the right fabric and the result looks professionally made.
Pro Tip: Wrap your foam in a layer of thin polyester wadding before adding your fabric. This softens the edges and gives the finished piece a more expensive, rounded appearance.
Upcycling and quick craft updates
Small projects punch above their weight in a decorating workflow. Repainting a piece of furniture with chalk paint, adding peel-and-stick wallpaper to a chimney breast, or framing a set of botanical prints for a gallery wall all take a few hours and cost very little. These are the projects to do last, once your anchoring decisions are locked in. They personalise the space without dictating the layout.
For lighting, swapping dated fixtures or adding a floor lamp costs between £40 and £130 and changes the mood of a room dramatically. Always turn the power off at the consumer unit before touching any wired fitting. For plug-in lamps and battery-operated options, no electrical knowledge is needed at all.
Verifying results and troubleshooting
Once your project is physically complete, resist the urge to immediately photograph it and call it done. Walk the room. Live in it for 48 hours. You'll notice things you couldn't see when you were focused on installation.
Pro Tip: Take photos of the finished room and review them on your phone rather than looking at the room directly. The camera flattens depth and makes spatial imbalances much easier to spot.
Here is what to assess after completion:
- Rug sizing: an undersized rug is one of the most common finishing mistakes. The front legs of all main seating pieces should sit on the rug in a living area.
- Lighting layers: check that you have ambient light (ceiling or pendant), task light (reading lamp, desk lamp), and at least one accent source.
- Furniture flow: can two people move around the room comfortably without squeezing past anything? If not, reconsider placement before adding more items.
- Colour cohesion: step back and squint. If one element jumps out awkwardly, it's likely the wrong tone rather than the wrong style.
For ongoing maintenance, build a simple schedule. Repaint woodwork every two to three years, refresh accessories seasonally, and reassess your layout any time your household changes. Rooms are not permanent. Treating them as evolving projects keeps them feeling intentional rather than static. For more creative starting points, Iw1t's practical home décor ideas list is worth bookmarking for future phases.
My honest take on making this workflow stick
I've worked through enough DIY home décor projects to know that the planning phase feels like an obstacle right up until you skip it once and regret it deeply. The bedroom I rushed through in a weekend, buying items as inspiration struck, cost me nearly twice what the same result would have with a proper sequence. Nothing was wrong with any individual piece. The problem was that nothing talked to anything else.
What I've found genuinely useful is treating the mood board not as an aesthetic exercise but as a decision filter. If a potential purchase doesn't match at least two elements on the board, it doesn't come home. That rule alone has saved me from hundreds of pounds in well-intentioned mistakes.
I also think people underestimate how much the execution quality of a few key projects changes the perception of a whole room. A perfectly painted wall and a well-made upholstered headboard signal care and competence. They make every other element look more intentional, even the inexpensive ones. Effective DIY home décor relies more on prioritisation than on budget size. Spend where it shows. Save everywhere else.
The final thing I'd say: trust your instincts once the structure is in place. The workflow gives you guardrails, not a straitjacket. Once your furniture is positioned and your palette is set, the accent choices are yours to enjoy.
— Scott
Ready to start your next project?

At Iw1t, we've put together a range of quality home and lifestyle products chosen with exactly these kinds of creative home projects in mind. Whether you're sourcing practical tools, finishing touches, or seasonal décor updates, the Iw1t online store makes it easy to find well-made items that fit your style and your budget. As a family-run UK business, we know what it means to want your home to feel genuinely yours. Browse our curated selection and find the pieces that make your next project come together properly.
FAQ
What is a DIY home décor workflow?
A DIY home décor workflow is a structured sequence of planning, sourcing, executing, and reviewing home décor projects. It helps you make decisions in the right order to avoid costly mistakes and redesign regrets.
What should I buy first when decorating a room?
Always purchase your largest anchor furniture pieces first, before selecting rugs, lighting, or accessories. Poor sequencing is behind the majority of redesign regrets.
Is painting a room worth doing yourself?
Yes. Interior painting is the highest-return DIY project available: supplies cost around £40 to £60, compared to £300 or more for professional labour per room.
How do I know if my DIY project has worked?
Live in the finished space for at least 48 hours and review photos of the room on your phone. Check rug sizing, lighting layers, furniture flow, and colour cohesion before making any further changes.
What fabric works best for DIY upholstery projects?
Upholstery-weight fabrics such as boucle, velvet, and linen weave are the most reliable choices. Stretch fabrics pull unevenly across foam and tend to show the edges of the padding underneath.